![dark-1.png]](https://support.senturo.com/hs-fs/hubfs/dark-1.png?height=40&name=dark-1.png)
Overview
Security Policy Automations let you enforce your organization's security policies automatically, so you don't have to apply actions device by device. Each automation follows a simple, readable pattern: when a condition is met, Senturo does one or more actions, for a chosen set of devices, during the schedule you define.
This model fits the way real fleets are managed. You can lock a device the moment it leaves an approved site, put a device into Missing Mode outside working hours, alert an administrator when a device connects to an unapproved network, or run any combination of these — consistently, and without manual effort.
This article explains what Security Policy Automations are, the four building blocks that make up every automation, how automations are saved and monitored, and where to go for step-by-step instructions. If you're ready to build one now, see How to Create a Security Policy Automation.
What Is a Security Policy Automation?
A Security Policy Automation is a rule that runs on its own once you activate it. You define a single condition that starts it (the trigger), one or more responses (the actions), the devices it applies to, and the schedule during which it is allowed to run. Senturo then evaluates that rule continuously and carries out the actions whenever the condition is met.
Because each automation reads like a sentence — "When a device is outside a geofence, set Missing Mode and lock it, for devices in the Executive Devices group, during my active schedule"" — you can see exactly what an automation will do before you turn it on.
The Four Building Blocks
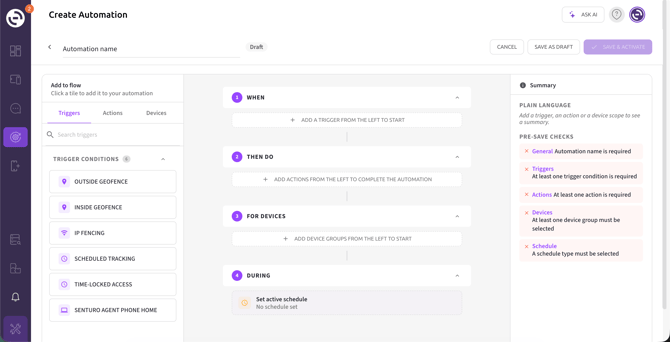
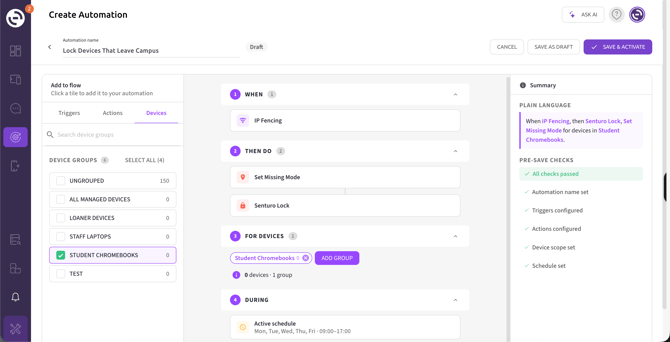
Every automation is assembled from four sections in the builder: When, Then Do, For Devices, and During. You add items to each section by clicking on the tiles in the Add to flow panel.
1. When — the trigger
The trigger is the condition that starts the automation. Each automation has exactly one trigger. Senturo offers four trigger conditions:
- Outside Geofence — the device leaves a geofence you select.
- Inside Geofence — the device enters a geofence you select.
- IP Fencing — the device connects from a network outside your approved IP ranges.
- Senturo Agent Phone Home — the Senturo agent checks in (or fails to check in as expected).
The two geofence triggers require you to select a specific saved geofence. You can pick an existing geofence or create a new one on the spot with the + button. See Creating and Managing Geofences and the full Automation Triggers reference for details on each trigger.
2. Then Do — the actions
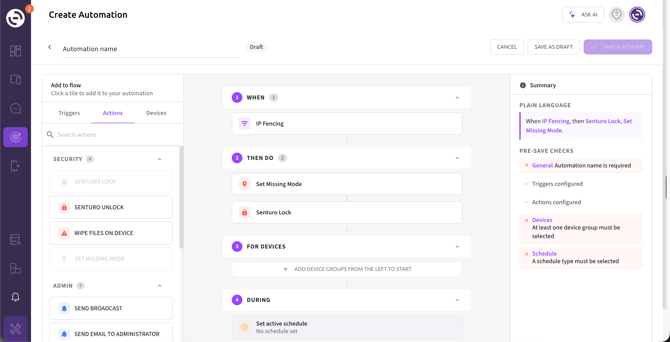
Actions are what Senturo does when the trigger fires. You can add more than one action, and all of them run. Actions execute in the order they are listed, from top to bottom, and you can reorder them with the up and down arrows on each action or remove one with the ✕.
Actions are grouped by category:
- Security — Senturo Lock, Senturo Unlock, Wipe Files on Device, Set Missing Mode.
- Admin — Send Broadcast, Send Email to Administrator, Add Device to Group, Remove Device from Group, Add Tag to Device, Remove Tag from Device, Add Note to Device.
- Tracking — Pull Current Location, Take Screenshots, Pull Current Network Data.
- MDM Integrations — Jamf Lock, Jamf Lost Mode, Microsoft Intune Lock, Meraki Lock, Meraki Wipe, Google Disable.
Why the order matters: because actions run top to bottom, sequence can change the outcome. For example, placing Set Missing Mode above Senturo Lock switches the device to real-time tracking before it locks. Arrange actions to match the response you want.
Some actions have requirements: MDM Integration actions need the corresponding integration (Jamf Pro, Microsoft Intune, Cisco Meraki, or Google Admin Console) connected, and some actions are platform-specific (for example, Take Screenshots is not available on iOS/iPadOS or Android). See the Automation Actions reference for platform support and prerequisites.
3. For Devices — the scope
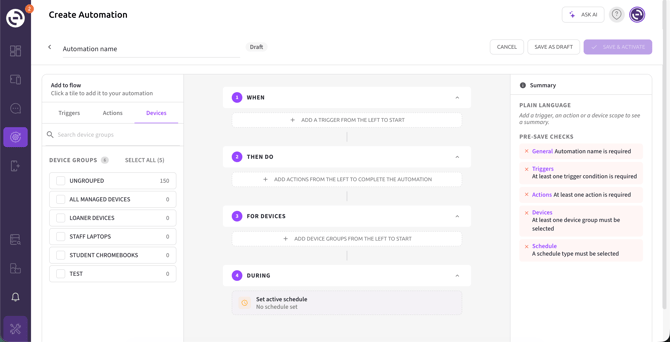
This section defines which devices the automation applies to. You select one or more device groups, each of which shows its current device count. You can search groups, select individual groups, or use Select all. Devices that aren't assigned to a group appear under Ungrouped.
4. During — the schedule
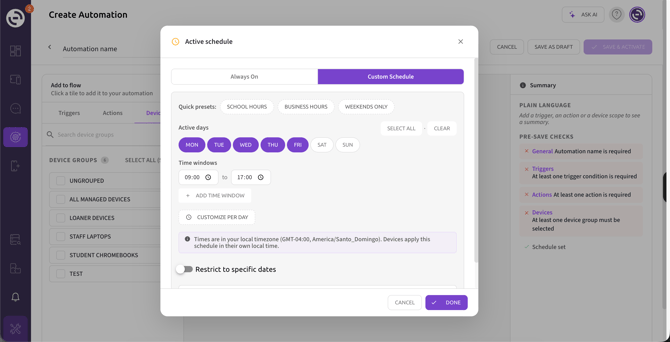
The schedule controls when the automation is allowed to run. There are two options:
- Always On — the automation runs continuously, 24 hours a day, 7 days a week.
- Custom Schedule — the automation runs only during the days and time windows you define, with quick presets for School Hours, Business Hours, and Weekends Only, plus per-day scheduling and optional date restrictions.
Why this matters: the times you set are in your local timezone, but each device applies the schedule in its own local time. This keeps a School Hours schedule correct for devices across different timezones without extra configuration. See Scheduling Automations for the full details.
The Summary Panel: Plain Language and Pre-Save Checks
As you build, the Summary panel on the right does two things. Plain Language restates your automation as a readable sentence so you can confirm the logic at a glance. Pre-Save Checks lists what's still required before the automation can be activated:
- An automation name.
- One trigger condition (and, for geofence triggers, a selected geofence).
- At least one action.
- At least one device group.
- A schedule type.
The panel also includes Preview affected devices, which shows the devices currently in the automation's scope so you can confirm the targeting before activating.
Each check turns green as you complete it. You cannot use Save & Activate until all checks pass.
Automation States and Compliance
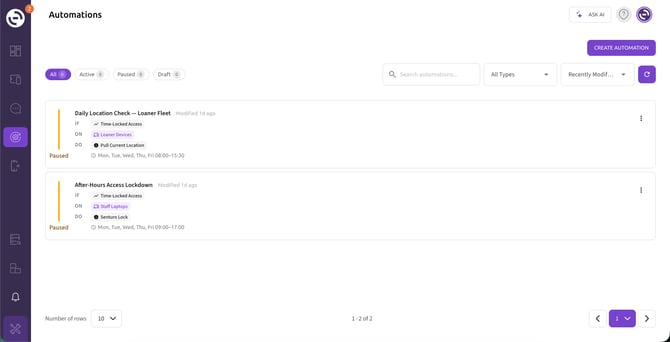
When you finish building, you have two options. Save as Draft stores the automation without running it — useful for work in progress. Save & Activate turns it on immediately. From the Automations list you can filter automations by their state:
- Active — currently running.
- Paused — saved and complete, but temporarily not running.
- Draft — not yet activated. Activating a draft is one-way; afterwards it can be paused but not returned to Draft.
Each automation card also shows a live compliance indicator. When no device in scope is violating the trigger condition, the card shows All compliant in green. When one or more devices are in breach, it shows a red non-compliant count — the number of devices in the automation's scope currently violating the trigger condition, for example devices that are outside the geofence right now. It's a live indicator of how many devices are in breach at this moment, not a history of past actions.
From the Automations list you can search automations, filter by type, and sort them to find what you need. For managing automations after they're live, see Managing Automation Compliance and Statuses.
Conclusion
Security Policy Automations turn your security policies into rules that enforce themselves. By combining a single trigger, one or more ordered actions, a device scope, and a schedule, you can respond to risks consistently and instantly across your entire fleet. Once you understand the four building blocks, creating an automation is a matter of assembling the pieces that match the outcome you want.
FAQs
Q: How many triggers can one automation have? A: One. Each automation is started by a single trigger condition. If you need to respond to different conditions, create a separate automation for each.
Q: If I add several actions, do they all run, and in what order? A: All of them run. Actions execute in the order they appear in the Then Do section, from top to bottom. You can reorder them with the up and down arrows on each action.
Q: What do "All compliant" and the "non-compliant" count mean? A: They're the two states of an automation's live compliance indicator. All compliant means no device in scope is currently violating the trigger condition; a non-compliant count is the number of devices currently in breach. Both reflect the present moment, not a record of past actions.
Q: Do schedule times use my timezone or the device's? A: You set the schedule in your own local timezone, but each device applies it in its own local time. A schedule such as "School Hours" therefore stays correct for devices in different timezones automatically.
Q: Can I save an automation before it's finished? A: Yes. Use Save as Draft to store your progress. The automation will not run until you activate it, and it will remain in the Draft state in your Automations list.