![dark-1.png]](https://support.senturo.com/hs-fs/hubfs/dark-1.png?height=40&name=dark-1.png)
Overview
Security Policy Automations let you respond to security conditions across your fleet automatically. Instead of locking or tracking devices one at a time, you build a rule once and Senturo enforces it for you: when a condition is met, Senturo does one or more actions, for the devices you choose, during the schedule you set.
This guide walks through creating an automation from start to finish in the automation builder. You'll name the automation, add a trigger, add one or more actions, select the devices it applies to, set its schedule, and activate it. For a conceptual overview of how automations work, see Understanding Security Policy Automations.
Steps to Create a Security Policy Automation
- Open the automation builder
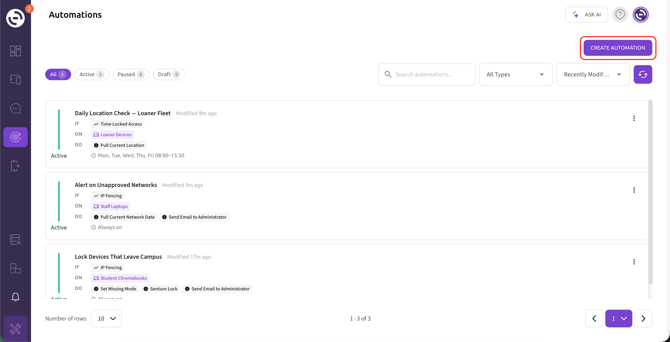
- Navigate to Automations in your Senturo dashboard.
- Click on Create Automation. The builder opens with an empty flow and a Draft status.
- Name your automation
- In the Automation name field at the top, enter a clear, descriptive name, for example:
Lock devices outside geofence. - A good name describes the trigger and the outcome, so the automation is easy to identify later in the Automations list.
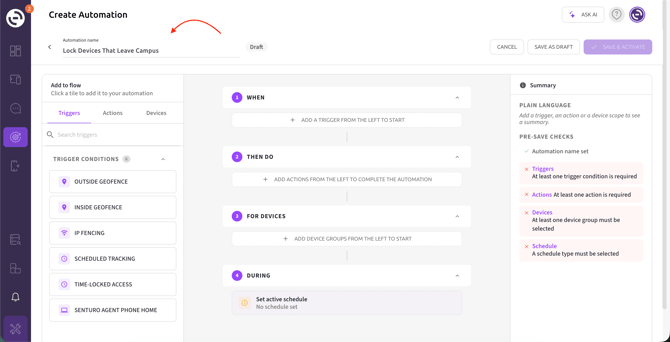
- In the Automation name field at the top, enter a clear, descriptive name, for example:
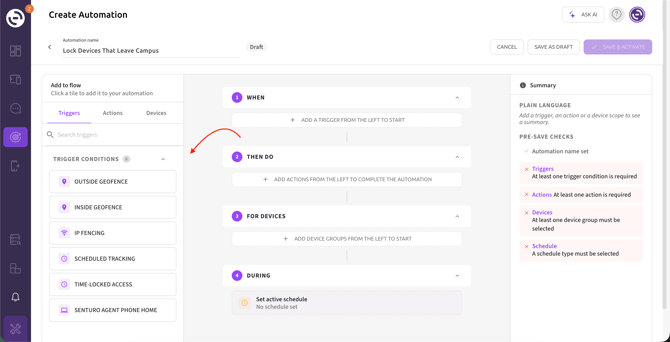
- Set your trigger (When) The trigger is the condition that starts the automation. Each automation has exactly one trigger.
- On the left panel, make sure the Triggers tab is selected.
- Under Trigger Conditions, click on the trigger you want:
- Outside Geofence — the device leaves a geofence you select.
- Inside Geofence — the device enters a geofence you select.
- IP Fencing — the device connects from a network outside your approved IP ranges.
- Senturo Agent Phone Home — the Senturo agent checks in (or fails to check in as expected).
- The trigger is added to the When section and opens its configuration. Complete the required options for the trigger you chose. The two geofence triggers require you to select — or create — a geofence.
- For step-by-step configuration of each trigger, see the Automation Triggers reference. To create a geofence for a geofence trigger, see Creating and Managing Geofences.
- Add your actions (Then Do) Actions are what Senturo does when the trigger fires. You can add more than one action, and all of them will run.
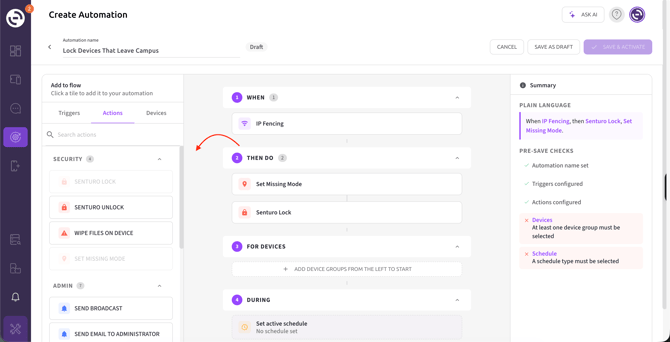
- Click on the Actions tab in the left panel.
- Click on each action you want to add. Actions are grouped by category:
- Security — Senturo Lock, Senturo Unlock, Wipe Files on Device, Set Missing Mode.
- Admin — Send Broadcast, Send Email to Administrator, Add Device to Group, Remove Device from Group, Add Tag to Device, Remove Tag from Device, Add Note to Device.
- Tracking — Pull Current Location, Take Screenshots, Pull Current Network Data.
- MDM Integrations — Jamf Lock, Jamf Lost Mode, Microsoft Intune Lock, Meraki Lock, Meraki Wipe, Google Disable.
- Each action you add appears in the Then Do section.
- Set the order. Actions run from top to bottom in the order they are listed. Use the up and down arrows on an action to reorder it, or the ✕ to remove it. For example, placing Set Missing Mode above Senturo Lock switches the device to real-time tracking before it locks.
Note: MDM Integration actions require the corresponding integration to be connected, and some actions are platform-specific (for example, Take Screenshots is not available on iOS/iPadOS or Android). See the Automation Actions reference for platform support and prerequisites.
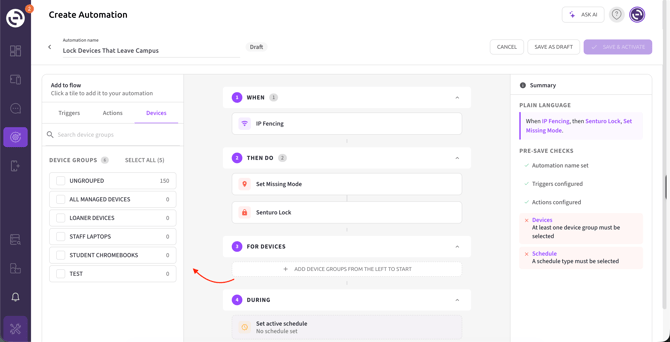
- Select your devices (For Devices)
- Click on the Devices tab in the left panel.
- Under Device Groups, select one or more groups the automation should apply to. Each group shows its current device count.
- Use the search field to find a specific group, or click on Select all to include every group. Devices that aren't assigned to a group appear under Ungrouped.
- Selected groups appear in the For Devices section.
- Set the schedule (During) The schedule controls when the automation is allowed to run.
- In the During section, click on Set active schedule.
- Choose a schedule type:
- Always On — the automation runs continuously, 24 hours a day, 7 days a week.
- Custom Schedule — the automation runs only during the days and times you define.
- If you choose Custom Schedule:
- Apply a quick preset (School Hours, Business Hours, or Weekends Only), or configure the schedule manually.
- Under Active days, select the days the automation should run.
- Under Time windows, set the start and end time. Click on + Add time window to add more than one window in a day.
- To set different hours for each day, click on Customize per day and configure each day individually in the Per-Day Schedule dialog.
- Optionally, turn on Restrict to specific dates to limit the automation to a date range.
- Click on Done to save the schedule.
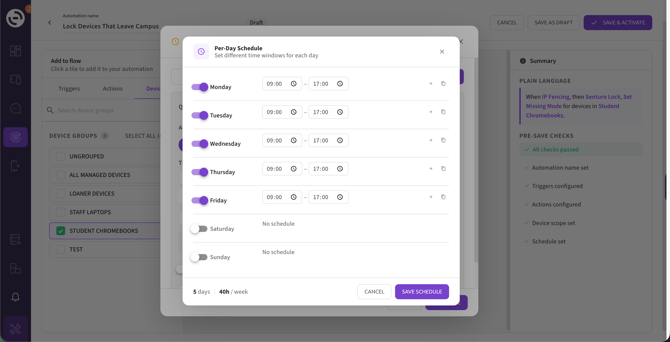
Why this matters: The times you set are in your local timezone, but each device applies the schedule in its own local time. This keeps a schedule such as "School Hours" correct for devices across different timezones without extra configuration.
- Review the summary and save
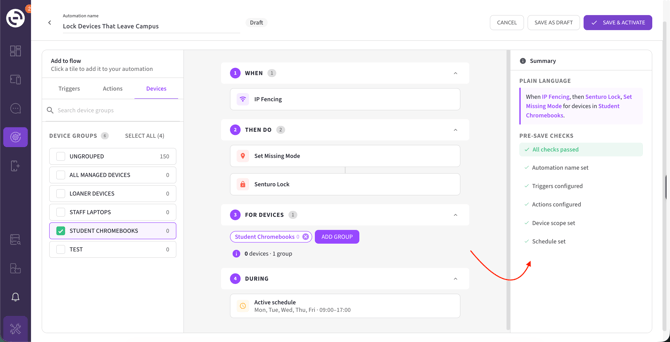
- On the right, check the Summary panel. The Plain Language description restates your automation as a sentence — for example, "When Outside Geofence, then Set Missing Mode for devices in Executive Devices" — so you can confirm the logic.
- Click on Preview affected devices to see exactly which devices the automation will apply to before you turn it on. This is the best way to catch a device scope that's broader than you intended.
- Confirm that every item under Pre-Save Checks is complete (green): automation name, trigger (and geofence, if applicable), at least one action, at least one device group, and a schedule type.
- Click on Save & Activate to turn the automation on immediately, or Save as Draft to store it without running it. You cannot use Save & Activate until all pre-save checks pass.
Verifying Your Automation
After you activate an automation, confirm it's set up correctly:
- It appears in the Automations list with an Active status.
- The card shows your trigger, action(s), device scope, and schedule.
- The non-compliant count shows how many devices in scope are currently violating the trigger condition. This is a live indicator of devices in breach right now — a useful check that the automation is scoped and configured as you intended.
Troubleshooting
The Save & Activate button is unavailable. One or more pre-save checks are incomplete. Review the Pre-Save Checks list in the Summary panel and complete any item marked with an ✕ — most often a missing automation name, an unselected geofence, no action, no device group, or no schedule type.
An action isn't applying to some devices. Some actions are platform-specific. For example, Take Screenshots is not available on iOS/iPadOS or Android. Confirm the action is supported on the device platforms in your selected groups.
The automation is active but no actions are running. Check that the current time falls within the automation's schedule, that the correct device groups are selected, and that the trigger condition is actually being met. The non-compliant count on the automation card shows how many devices are currently in breach of the trigger.
Conclusion
Creating a Security Policy Automation comes down to assembling four pieces: a single trigger, one or more ordered actions, a device scope, and a schedule. Once those are in place and the pre-save checks pass, you can activate the automation and let Senturo enforce your policy automatically across your fleet.
FAQs
Q: Can I use more than one trigger in a single automation? A: No. Each automation has exactly one trigger. If you need to respond to different conditions, create a separate automation for each.
Q: If I add several actions, do they all run? A: Yes. Every action in the Then Do section runs, in the order listed from top to bottom. Use the up and down arrows to change the order.
Q: Can I build an automation without activating it right away? A: Yes. Click on Save as Draft to store your progress. The automation stays in the Draft state and does not run until you activate it. Keep in mind that activating is one-way — once activated, an automation can be paused but not returned to Draft.
Q: Whose timezone does the schedule use? A: You set the schedule in your own local timezone, but each device applies it in its own local time. A schedule such as "School Hours" therefore stays correct for devices in different timezones automatically.
Q: Can I edit an automation after it's activated? A: Yes. Open the automation from the Automations list to edit its trigger, actions, devices, or schedule. You can also pause it without deleting it.