![dark-1.png]](https://support.senturo.com/hs-fs/hubfs/dark-1.png?height=40&name=dark-1.png)
Overview
A geofence is a virtual geographic boundary you define on a map. Senturo uses geofences to power location-based Security Policy Automations: when a device leaves or enters a geofence, an automation can respond automatically — for example, locking the device, setting Missing Mode, or alerting an administrator.
You create geofences once and reuse them across as many automations as you like. This article explains the two geofence types, how to create a geofence in the Geofence Builder, and how to manage your existing geofences.
Geofences are the foundation of the Inside Geofence and Outside Geofence triggers. For how those triggers are configured, see the Automation Triggers reference; to build an automation end to end, see How to Create a Security Policy Automation.
Geofence Types
Senturo offers two ways to define a geofence:
- Radius — a circular zone around a single point. You set the center (by dropping a pin or entering an address) and a radius in meters. Best for a specific site such as an office, campus, warehouse, or clinic.
- Jurisdiction — a zone defined by a boundary rather than a radius. Best for enforcing broader area boundaries rather than a single site.
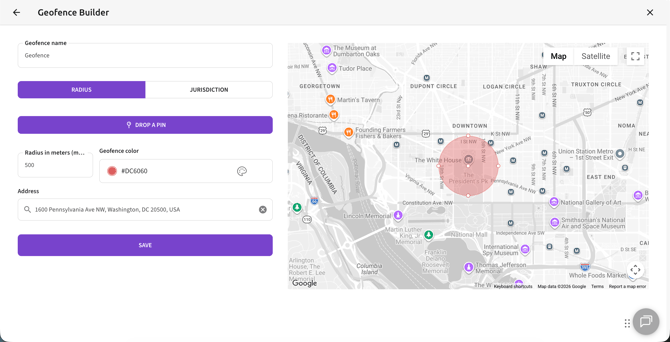
Steps to Create a Radius Geofence
- Open the Geofence Builder
- From the automation builder: while configuring an Inside Geofence or Outside Geofence trigger, click on the + button in the geofence picker.
- Enter a geofence name
- In the Geofence name field, enter a clear, descriptive name (for example,
Main CampusorRiverside Distribution Center). A good name makes the geofence easy to identify when you select it in a trigger.
- In the Geofence name field, enter a clear, descriptive name (for example,
- Select the Radius type
- Make sure Radius is selected (rather than Jurisdiction).
- Set the location
- Enter an Address in the address field and select the match, or click on Drop a Pin to place the center directly on the map.
- Use Map or Satellite view and the map controls to confirm the location.
- Set the radius
- In Radius in meters, enter the size of the zone. The minimum is
50meters. The circle on the map updates to show the coverage area.
- In Radius in meters, enter the size of the zone. The minimum is
- Choose a color
- Under Geofence color, pick a color (or enter a hex value such as
#DC6060). The color helps you distinguish this geofence from others on the map and in lists.
- Under Geofence color, pick a color (or enter a hex value such as
- Save the geofence
- Click on Save. The geofence is now available to select in the Inside Geofence and Outside Geofence triggers.
Creating a Jurisdiction Geofence
A Jurisdiction geofence defines the zone by a boundary rather than a radius. You create it in the same Geofence Builder: enter a Geofence name, select the Jurisdiction type instead of Radius, define the boundary the geofence should cover, choose a Geofence color, and click on Save.
Managing Your Geofences
Your saved geofences appear in a searchable list (including the geofence picker inside a geofence trigger). From this list you can:
- Search for a geofence by name.
- Review each geofence's name, color, radius, and address.
- Edit a geofence by clicking on the pencil icon, then updating its details in the Geofence Builder.
- Delete a geofence by clicking on the trash icon.
Note: Editing or deleting a geofence affects any automation that uses it. Before changing or removing a geofence, check which automations rely on it so you don't unintentionally change how they behave.
Using Geofences in Automations
Once a geofence exists, you can use it in an automation:
- Add an Inside Geofence or Outside Geofence trigger while building an automation.
- In the trigger's picker, select the geofence you want (or create a new one with the + button).
For the full trigger configuration, see the Automation Triggers reference.
Troubleshooting
The Save button is unavailable. The geofence needs the required details before it can be saved. Confirm you've entered a Geofence name and, for a Radius geofence, a valid location and a radius of at least 50 meters.
I can't find the address I typed. Confirm the address is complete and correctly spelled, then select the matching result. If the address doesn't resolve, use Drop a Pin to place the center manually on the map.
A geofence I created doesn't appear in my trigger. Confirm the geofence was saved (it should appear in the geofence list) and that you're searching by the correct name in the trigger's picker.
Conclusion
Geofences give your automations a precise sense of place. By creating a Radius or Jurisdiction geofence once, you can reuse it across any number of automations to keep devices within the boundaries that matter to your organization. With your zones defined, you're ready to build the geofence-based automations that lock, track, or alert whenever a device crosses a line.
FAQs
Q: What's the difference between a Radius and a Jurisdiction geofence? A: A Radius geofence is a circular zone around a point you choose, sized in meters. A Jurisdiction geofence is defined by a boundary rather than a radius. Use Radius for a specific site and Jurisdiction for broader area boundaries.
Q: Can I use one geofence in more than one automation? A: Yes. A geofence can be selected in as many automations as you need. You create it once and reuse it.
Q: Can I create a geofence while building an automation? A: Yes. In the geofence picker for an Inside Geofence or Outside Geofence trigger, click on the + button to open the Geofence Builder without leaving the automation.
Q: What happens to my automations if I edit or delete a geofence? A: Automations that use the geofence are affected by the change. Review which automations rely on a geofence before editing or deleting it.