Introduction:
This article explains how to deploy the Senturo app to iOS devices using Jamf Pro. You will download a PLIST configuration from Senturo, configure app settings in Jamf, and automate the app installation and enrollment process across your fleet.
Prerequisites
Before starting, make sure you have:
-
Devices running iOS 13 or later
Steps to Deploy Senturo to iOS Devices
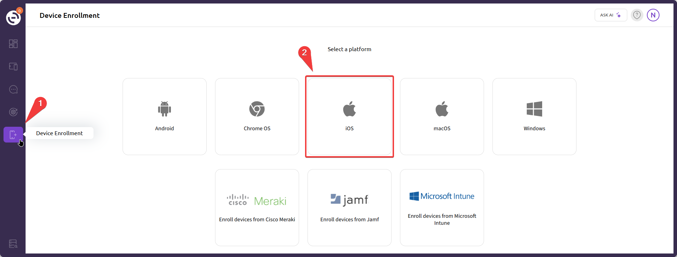
1. Navigate to Device Enrollment in Senturo
- Log in to the Senturo dashboard.
-
Click on Device Enrollment in the sidebar.
-
Select iOS as the platform.
-
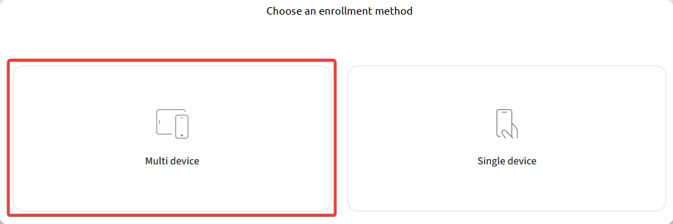
Choose Multi-Device Enrollment.
-
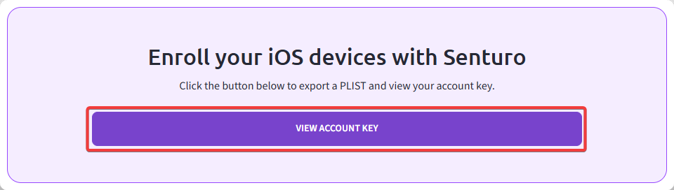
Download the PLIST file by clicking View Account Key.
2. Add the Senturo App in Jamf Pro
-
In Jamf Pro, go to Devices > Mobile Device Apps.
-
Click + New and choose App Store app or apps purchased in volume, then click Next.
-
Search for Senturo in the App Store.
-
Click Add next to the Senturo app for iPadOS or iOS, depending on your use case.
3. Configure App Settings
-
In the General tab:
-
Set the Distribution Method to Install Automatically or Prompt Users to Install.
-
Suggestion: Deselect Allow users to remove app (recommended for iOS 14 and later).
-
-
In the Scope tab:
-
Assign the app to the desired Targets (device groups or users).
-
Set any Limitations or Exclusions as needed.
-
4. Apply the PLIST App Configuration
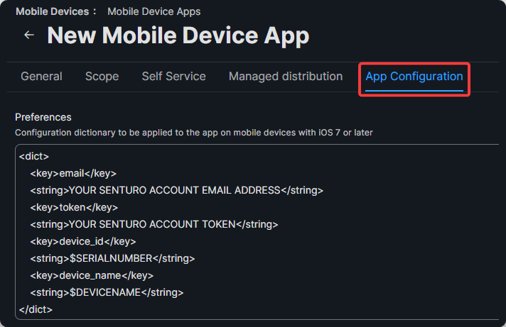
- In the App Configuration tab:
- Open the downloaded PLIST file from Senturo.
- Important: Remove the outer
<plist>tag. - Only copy the internal structure, like this:
<dict>
    <key>email</key>
    <string>YOUR SENTURO ACCOUNT EMAIL ADDRESS</string>
    <key>token</key>
    <string>YOUR SENTURO ACCOUNT TOKEN</string>
    <key>device_id</key>
    <string>$SERIALNUMBER</string>
    <key>device_name</key>
    <string>$DEVICENAME</string>
</dict>
- Paste the configuration into the App Configuration tab in Jamf.
- Click Save to finish the app setup.
5. Steps to Complete Device Enrollment
-
Accept the installation prompt for Senturo on the iOS device.
-
Open the Senturo app on the device to complete enrollment.
-
Approve the following permission requests when prompted:
-
Background App Refresh
-
Cellular Data
-
Location (Always Allow and Precise Location)
-
Notifications
-
- Tap Scan for MDM Enrollment inside the Senturo app to complete the device registration.
- Monitor your Senturo dashboard to verify that all devices have enrolled successfully.
Conclusion
Deploying the Senturo app through Jamf Pro automates the device enrollment process and ensures users have the necessary permissions configured for optimal functionality. Following these steps helps streamline large-scale deployments across your organization.
FAQs
Q: What if the Senturo app does not install automatically on devices?
A: Double-check the distribution method in Jamf Pro. Ensure it is set to Install Automatically and that the device is correctly scoped.
Q: What should I do if the app configuration fails to apply?
A: Confirm that the PLIST file structure is correct and that no unnecessary tags like <plist> are included at the outermost level.
Q: How long does device enrollment take after installing the app?
A: Enrollment usually completes instantly. However, timing can vary depending on device connectivity and MDM policy refresh intervals.