Overview
Once your Incident IQ Integration has been configured in Senturo, administrators can manage user access, permissions, and API keys directly from the Senturo interface.
This guide explains how to:
-
Add and remove users
-
Assign and edit permissions
-
Regenerate API keys
-
Maintain secure, ongoing access to the integration
1. Accessing User Management
-
Log in to Senturo.
-
Navigate to Integrations.
-
Locate Incident IQ and click Manage and then click Manage Users.
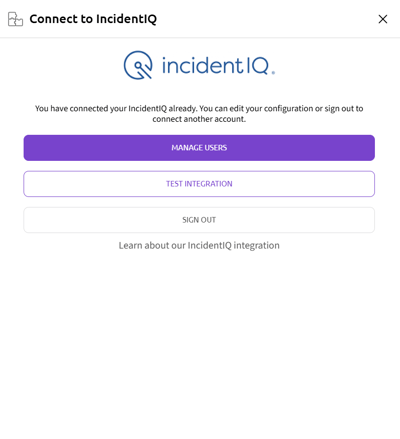
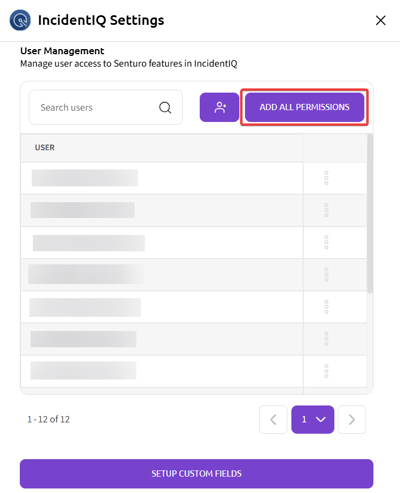
The User Management panel displays all users who have access to Senturo features within Incident IQ.
2. Adding and Removing Users
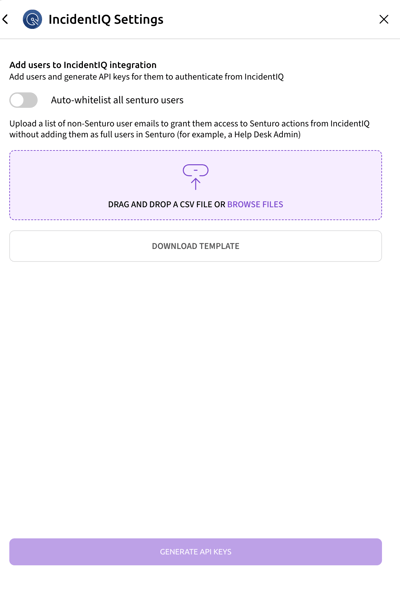
To Add Users
Users can be added during the initial integration setup or at any time afterward.
-
Navigate to Integrations.
-
Locate Incident IQ and click Manage and then click + Add Users.
-
Use the Upload Spreadsheet option to add users or Auto-whitelist senturo users.
-
For the spreadsheet, enter the email address of each user to be added.
-
Assign appropriate permissions.
To Remove Users
-
Navigate to Integrations.
-
Locate Incident IQ and click Manage and then click Manage Users.
-
Locate the user in the list you would like to remove.
-
Click the menu (⋮) beside their name.
-
Select Delete to remove and revoke access.

3. Managing Permissions
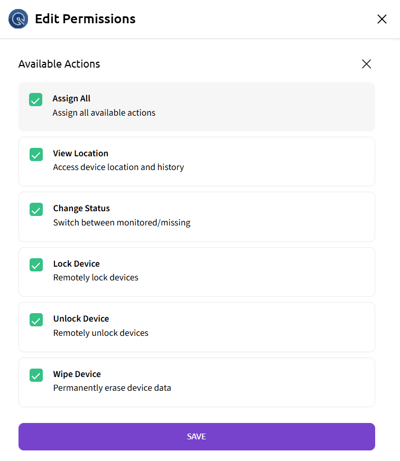
Each user’s permissions determine which Senturo actions they can perform in Incident IQ.
Available permissions include:
-
View Location
-
Change Status
-
Lock Device
-
Unlock Device
-
Wipe Device
Edit Permissions for a User
-
Navigate to Integrations.
-
Locate Incident IQ and click Manage and then click Manage Users.
-
In the User Management panel, click Manage User next to the desired account.
-
Check or uncheck permissions as required.
-
Click Save to apply changes.
Assign All Permissions
To grant all available actions to every listed user:
-
Click Add All Permissions at the top of the User Management panel.
4. Regenerating API Keys
Each user connected to the Incident IQ integration requires an active Senturo API Key.
Steps to Regenerate an API Key:
-
In User Management, locate the user in the list.
-
Click the menu (⋮) beside their name and click Manage User.
-
Click Generate New API Key at the top.
-
Copy and securely store the new key.
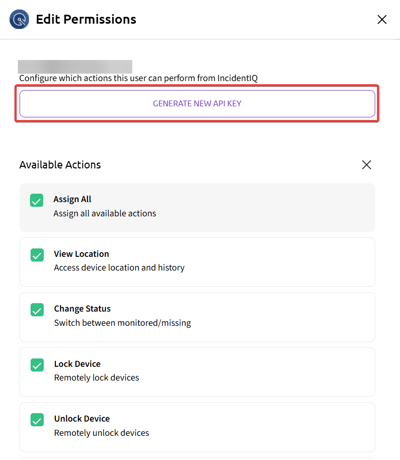
Note: Once a new key is generated, the previous key becomes invalid immediately.
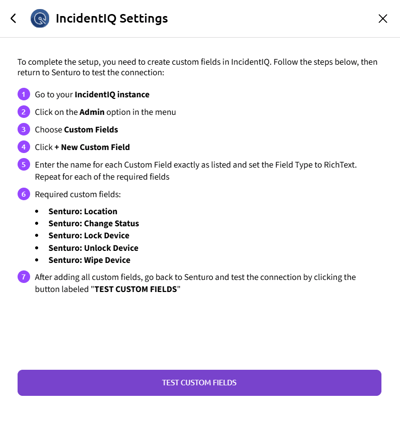
5. Testing the Integration
After completing the setup and creating all required custom fields in Incident IQ, you can test the configuration from Senturo to verify that everything is correctly aligned.
-
Navigate to Integrations.
-
Locate Incident IQ and click Manage.
-
Click on Test Integration and then click on Test Custom Fields.
-
Senturo will check your connected Incident IQ instance to confirm that all required fields are present and correctly named.
6. Best Practices for Ongoing Management
-
Rotate API Keys Regularly: Regenerate API keys every 90 days or after role changes for security compliance.
-
Limit High-Risk Permissions: Reserve Wipe Device and Unlock Device for senior IT staff or administrators.
-
Audit User Access: Review the user list frequently to ensure all active accounts are valid.
Conclusion
By managing users and API keys effectively, administrators can maintain a secure and well-controlled integration between Senturo and Incident IQ.
Regular audits and key rotations ensure data integrity and prevent unauthorized access to device actions.
FAQs
Q: How often should API keys be regenerated?
A: For security, it’s recommended to regenerate API keys every 90 days or immediately if a user leaves the organization.
Q: Can permissions be edited in bulk?
A: Yes. Use the Add All Permissions feature to apply full permissions to all listed users simultaneously.
Q: What happens if a user’s API key is deleted?
A: The user will lose access to Senturo actions in Incident IQ until a new key is generated and applied.