---
title: How to Deploy Senturo for iOS/iPadOS with Microsoft Intune
description: Learn how to deploy Senturo on iOS and iPadOS devices using Microsoft Intune, including app assignment, configuration policies, and enrollment verification.
---
[Skip to content](https://support.senturo.com/knowledge-base/how-to-deploy-senturo-for-ios-ipados-with-microsoft-intune#main-content)
English
Show submenu for translations
![dark-1.png\]](https://support.senturo.com/hs-fs/hubfs/dark-1.png?height=40&name=dark-1.png)
Open main navigation
Close main navigation
- English
Show submenu for translations
- Go to senturo.com
Go to senturo.com
How can we help you today?
- There are no suggestions because the search field is empty.
1. [Knowledge Base](https://support.senturo.com/knowledge-base?hsLang=en)
2. [Integrations](https://support.senturo.com/knowledge-base/integrations?hsLang=en)
3. [Microsoft Intune](https://support.senturo.com/knowledge-base/integrations?hsLang=en#microsoft-intune)
# How to Deploy Senturo for iOS/iPadOS with Microsoft Intune
## Silently push the Senturo app and enrollment configuration to managed devices at scale
#### Overview
This guide walks IT administrators through deploying the Senturo app to iOS/iPadOS devices managed by Microsoft Intune. The process consists of three main stages: connecting Senturo to your Intune environment, adding and assigning the Senturo app to your device groups, and creating an App Configuration Policy that automatically enrolls each device into Senturo using its unique serial number. No manual setup is required on the device.
By the end of this guide, Senturo will be installed on your managed iOS/iPadOS devices and each device will be automatically enrolled in Senturo, ready for location tracking and fleet management.
**What you will accomplish:**
- Connect Senturo to Microsoft Intune (one-time setup)
- Add and assign the Senturo iOS app in the Intune admin center
- Create an App Configuration Policy to auto-enroll devices using their serial number
- Verify successful deployment and troubleshoot common issues
---
#### Prerequisites
Before starting, confirm the following are in place.
### iOS/iPadOS Devices
- **iOS/iPadOS 17 or later** (required by Microsoft Intune for device enrollment and management). Devices running earlier versions cannot be enrolled or managed by Intune and will not receive the Senturo app or configuration policy
- **Devices must be enrolled in Intune** as the MDM provider. The App Configuration Policy used in this guide (Managed Devices type) only applies to MDM-enrolled devices
- Devices enrolled via **Automated Device Enrollment (ADE) through Apple Business Manager or Apple School Manager** are strongly recommended. ADE-enrolled devices are supervised, which provides additional management capabilities and a smoother deployment experience
---
#### Step 1: Connect Senturo to Microsoft Intune
Before deploying the app, connect your Senturo account to Microsoft Intune. This integration enables Senturo to sync device data from Intune and allows remote actions (lock, wipe) to be triggered from the Senturo dashboard.
> **Already connected?** If you have already connected Senturo to Intune, skip to Step 2.
For full integration setup instructions, see: [Senturo Microsoft Intune Integration](https://support.senturo.com/knowledge-base/senturo-microsoft-intune-integration?hsLang=en)
**Summary of the connection process:**
1. In your Senturo dashboard, navigate to **Integrations** at the bottom-left of the screen
2. Click the **Connect** button next to Microsoft Intune
3. Sign in with your Microsoft Intune admin credentials when prompted
4. Review and approve the requested permissions, then enable the desired integration features (such as Auto-Enroll)
> **Note:** Connecting Senturo to Microsoft Intune is separate from deploying the Senturo app. The app deployment and App Configuration Policy (Steps 2 and 3) work independently of the integration. However, enabling the integration is recommended to get the most from Senturo, including automatic device import and remote actions.
---
#### Step 2: Add Senturo to Microsoft Intune
Add the Senturo app to Intune as an iOS Store App and assign it to the relevant device groups.
### 2a. Add the Senturo App
1. Sign in to the [Microsoft Intune admin center](https://intune.microsoft.com) at intune.microsoft.com
2. In the left navigation pane, click on **Apps**, then click **All Apps**
3. Click **+ Create** (the label may show as **Add** depending on your version)
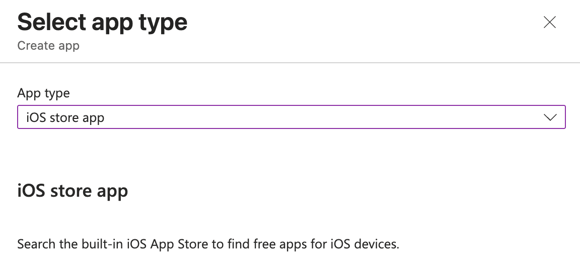
4. In the **Select app type** flyout pane, scroll to **Store app** and choose **iOS store app**, then click **Select**
5. On the App information page, click **Search the App Store**
6. Select your country/region from the dropdown, then type **Senturo** in the search field
7. Click on the **Senturo** app published by **Senturo Ltd**, then click **Select**
8. Review the app information (name, publisher, description). Edit the description or category if required to match your organisation's standards, then click **Next**
### 2b. Assign the App to Device Groups
1. On the **Assignments** tab, click **+ Add group** under the **Required** section
> **Important: Use 'Required', not 'Available'**
>
> For managed devices, always assign Senturo as **Required**. This automatically installs the app on all devices in the assigned groups without requiring any action from end users. The **Available for enrolled devices** option only makes the app visible in the Company Portal. It will not install automatically.
1. Search for and select the device groups that contain your iOS/iPadOS devices, then click **Select**
2. Review the assignments, then click **Next**
3. On the **Review + create** tab, review the configuration and click **Create**
Intune will begin distributing the app to devices in the assigned groups. Installation may take up to 15 to 30 minutes depending on device check-in schedules.
> **Do not open the Senturo app yet.** After the app installs on a device, do not open it. The App Configuration Policy (created in Step 4) must be in place first. Opening the app before the configuration policy has applied may result in the device not enrolling correctly in Senturo.
---
#### Step 3: Retrieve Your Senturo Enrollment Credentials
To configure the App Configuration Policy, you need your Senturo account's enrollment credentials: your account email, token, and the XML configuration data. These are found in the Senturo dashboard.
1. Log in to your Senturo dashboard
2. Navigate to **Device Enrollment**, then click **iOS**
3. Click **Multi Device**
4. Click **View Account Key**. Your account email and token will be displayed, and a PLIST file will be downloaded automatically
5. Keep this browser tab open. You will need the email and token values in the next step. The downloaded PLIST file is for reference only. You do not need to upload the file itself to Intune
> **Keep your token secure.** Your Senturo account token is sensitive. Do not share it publicly or commit it to source control. If you believe your token has been compromised, contact Senturo support to have it regenerated.
---
#### Step 4: Create the App Configuration Policy in Intune
The App Configuration Policy delivers your Senturo enrollment credentials to the app on each device automatically, using the device's serial number as a unique identifier. This is what causes Senturo to enroll each device without any manual input.
### 4a. Create the Policy
1. In the Intune admin center, navigate to **Apps**, then click **Configuration** (also shown as **App Configuration Policies** in some versions)
2. Click **+ Create**, then select **Managed devices**
> **Important: Choose 'Managed Devices', not 'Managed Apps'**
>
> **Managed devices** delivers configuration through the MDM channel and is required for Senturo. It supports device-specific variables such as ``, which Senturo uses to uniquely identify each device.
>
> **Managed apps** (MAM) is designed for BYOD scenarios where devices are not enrolled in MDM. It does not support device-specific variables like `` and will not work for this deployment. Do not select this option.
### 4b. Configure the Basics
1. Enter a descriptive **Name** for the policy, for example: **Senturo - iOS Enrollment Configuration**
2. Under **Platform**, select **iOS/iPadOS**
3. Under **Targeted app**, click **Select app**, search for **Senturo**, select it, and click **OK**
4. Click **Next**
### 4c. Configure the XML Enrollment Data
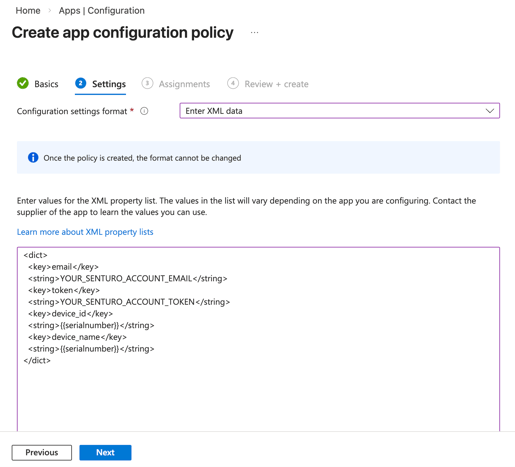
1. On the **Settings** page, change the **Configuration settings format** dropdown to **Enter XML data**
2. In the XML data field, paste the following block, replacing the placeholder values with your actual Senturo account email and token from Step 3:
```
email YOUR_SENTURO_ACCOUNT_EMAIL token YOUR_SENTURO_ACCOUNT_TOKEN device_id device_name
```
**Important notes about the XML:**
- **Paste only the `...` block.** Do not include the `` declaration, ``, or `` wrapper tags. Intune expects only the dict block for App Configuration Policy XML data
- **Replace `YOUR_SENTURO_ACCOUNT_EMAIL`** with the email address of your Senturo admin account (visible in the Senturo dashboard under View Account Key)
- **Replace `YOUR_SENTURO_ACCOUNT_TOKEN`** with the token value displayed in the Senturo dashboard
- **Leave `` exactly as shown.** This is an Intune device variable replaced at policy delivery time with the actual serial number of each device. It is case-sensitive and must be all lowercase. Using `` or `` will cause the literal text to appear instead of the device's serial number
1. Click **Next**
### 4d. Assign the Policy
1. On the **Assignments** tab, click **+ Add group** under **Included groups**
2. Select the same device groups you assigned the Senturo app to in Step 2, then click **Select**
3. Click **Next**
4. On the **Review + create** tab, review your settings and click **Create**
> **Note:** Once an App Configuration Policy is created with **Enter XML data** selected, the configuration format cannot be changed. If you need to switch between XML and the Configuration Designer, you must create a new policy.
---
#### Step 5: Configure Required Permissions on iOS Devices
> **Manual action required on each device.**
>
> Apple does not allow any MDM solution, including Microsoft Intune, to pre-approve or silently grant Location Services permissions to apps on iOS/iPadOS. This is a core Apple privacy protection that applies even to supervised, ADE-enrolled devices. The steps below must be completed manually on each device, either by IT staff during provisioning or by the end user at first launch.
Once the Senturo app has been installed on a device and the App Configuration Policy has applied (allow up to 20 minutes; see Step 6), open the Senturo app and complete the following.
### 5a. Grant Location Services
1. When Senturo opens for the first time, it will prompt for location access. Select **Always Allow** to enable continuous location tracking
2. If the prompt does not appear, or to verify the setting, navigate to **Settings > Privacy & Security > Location Services > Senturo** and ensure it is set to **Always**
> **Why 'Always Allow' is required:** Senturo must be permitted to access location 'Always' (including when the app is in the background) to report device location every 10 minutes in Secure Mode and in real-time during Missing Mode. Selecting 'While Using' or 'Never' will prevent Senturo from tracking the device.
### 5b. Enable Notifications
1. When prompted, tap **Allow** to enable Senturo notifications
2. Notifications enable Senturo to display Broadcast messages pushed from the dashboard to iOS/iPadOS devices. Without this permission, broadcast messages will not appear on the device
### 5c. Verify Background App Refresh
1. Navigate to **Settings > General > Background App Refresh**
2. Ensure Background App Refresh is set to **On** globally, and that Senturo is enabled in the per-app list
Background App Refresh allows Senturo to continue sending location updates and checking for remote actions even when the app is not in the foreground.
---
#### Step 6: Verify the Deployment
After creating the App Configuration Policy, allow up to 20 minutes for the policy to be delivered to devices and for the devices to enroll in Senturo.
### Verify Policy Delivery in Intune
1. In the Intune admin center, navigate to **Apps > Configuration** and click on your Senturo App Configuration Policy
2. Click on **Device install status**
3. Devices that have received the policy will appear with a **Succeeded** status. A **Pending** status means the device has not yet checked in. This is normal for the first 15 to 20 minutes after policy creation
4. To force an immediate sync for a specific device, navigate to **Devices > All Devices**, select the device, and click **Sync** from the top toolbar
### Verify Enrollment in Senturo
1. In the Senturo dashboard, navigate to **Devices**
2. Check that the enrolled iOS/iPadOS devices appear in the device list. Devices will show their serial number, model, and last-seen location once Location Services has been granted and the first location update has been transmitted
3. If devices do not appear within 30 minutes of the policy showing **Succeeded** in Intune, see the Troubleshooting section below
---
#### Troubleshooting
### App Is Not Installing on Devices
- **Assignment not set to Required:** Verify the app assignment is set to **Required**, not **Available for enrolled devices**. Navigate to the Senturo app in Intune > **Properties > Assignments** and confirm the assignment type
- **Devices not in the assigned group:** Confirm the device you are testing is a member of the group assigned in Step 2. Navigate to **Devices > All Devices**, select the device, and check **Group Memberships**
- **App Store is restricted:** If your device restrictions profile disables the App Store or restricts app installation, this will prevent installation. Review your Intune device restriction profiles for conflicting settings
- **Policy propagation delay:** Newly enrolled devices check in every 15 minutes for the first hour, then approximately every 8 hours. Allow sufficient time before investigating. Use the **Sync** remote action in Intune to force an immediate check-in
### App Installed but Device Not Enrolling in Senturo
- **Wrong policy type selected:** Verify the App Configuration Policy type is **Managed devices**, not **Managed apps**. Navigate to the policy in Intune and check the **Device enrollment type** field. If it shows **Managed apps**, create a new policy with the correct type
- **XML data entry error:** Review the XML in the App Configuration Policy. Ensure the `` block is correct, your account email and token are accurate, and `` is lowercase with no extra spaces or characters. Even a single character error will prevent enrollment
- **Policy not assigned to the same groups as the app:** The App Configuration Policy must be assigned to the same groups as the Senturo app. A device that has the app but not the config policy will not enroll. Verify assignments for both
- **App opened before policy applied:** If Senturo was opened before the App Configuration Policy was delivered, close the app, wait for the policy to show **Succeeded** in Intune, then reopen the app. You may need to delete and reinstall the app if the issue persists
- **Token mismatch:** Confirm the token in your XML matches exactly what is shown in the Senturo dashboard under **Device Enrollment > iOS > Multi Device > View Account Key**. Copy and paste the token directly to avoid transcription errors
### Location Not Reporting After Enrollment
- **Location Services not granted:** The most common cause. Navigate to **Settings > Privacy & Security > Location Services > Senturo** on the device and ensure the permission is set to **Always**. See Step 5 for instructions
- **Background App Refresh disabled:** Navigate to **Settings > General > Background App Refresh** and ensure it is enabled globally and for Senturo specifically
- **Device not yet updated:** In Secure Mode, Senturo reports location every 10 minutes. If you have just enrolled, wait at least 10 to 15 minutes for the first location update to appear in the Senturo dashboard
- **Low Power Mode enabled:** iOS significantly restricts background activity in Low Power Mode, which will prevent Senturo from reporting location. Disable it via **Settings > Battery > Low Power Mode**
### App Configuration Policy Showing 'Not Applicable' in Intune
This status typically means the device is enrolled in Intune but the policy does not match. Common causes include a platform mismatch, the Senturo app not being installed and managed by Intune on that device, or the device not being in the assigned group. Review the policy's Basics settings and group assignments.
---
#### Conclusion
With the Senturo app deployed and the App Configuration Policy in place, your iOS/iPadOS devices are enrolled in Senturo and ready for location tracking, fleet management, and device recovery workflows. Each device is automatically identified by its serial number, eliminating the need for manual per-device configuration at scale.
For fleet-wide visibility, make sure Location Services has been granted as **Always Allow** on each device. This is the only step that requires manual action.
---
#### Frequently Asked Questions
**Q: Do I need to connect Senturo to Intune before deploying the app?**
A: No. The Intune integration (OAuth connection in the Senturo dashboard) and the app deployment are independent steps. You can deploy the app and App Configuration Policy before or after setting up the integration. However, enabling the integration is recommended as it enables features such as automatic device import and remote actions from the Senturo dashboard.
**Q: Why must I use 'Managed devices' and not 'Managed apps' for the App Configuration Policy?**
A: The 'Managed devices' policy type delivers configuration through the MDM channel and supports device-specific variables, including ``, which Senturo uses to uniquely identify each enrolled device. The 'Managed apps' type is designed for BYOD scenarios and does not support device variables. It cannot deliver the serial number to the app, and selecting the wrong type will result in devices failing to enroll in Senturo.
**Q: Can I pre-configure Location Services permissions through Intune to avoid the manual step?**
A: No. Apple does not allow MDM solutions to silently grant per-app Location Services permissions on iOS/iPadOS. This is a core privacy protection built into the operating system and applies even to supervised, ADE-enrolled devices. Location Services (set to 'Always Allow') must be granted manually on each device by IT staff during provisioning or by the end user at first launch. This is the only step in the deployment that requires physical interaction with each device.
**Q: How long does it take for the App Configuration Policy to reach devices?**
A: Typically between 5 and 20 minutes. Intune immediately attempts to notify enrolled devices when a new policy is created or assigned. If the push notification is not received, the device will apply the policy at its next scheduled check-in: every 15 minutes for the first hour after enrollment, then approximately every 8 hours. To force an immediate sync, navigate to **Devices > All Devices** in the Intune admin center, select the device, and click **Sync**.
**Q: What happens if a user opens the Senturo app before the App Configuration Policy has applied?**
A: If the app is opened before the configuration policy has been delivered, the device may not enroll in Senturo correctly. Wait for the App Configuration Policy to show a **Succeeded** status in Intune (check via **Apps > Configuration > \[Policy Name\] > Device install status**), then close and reopen the app. If enrollment still does not complete, try removing and reinstalling the Senturo app through Intune.
**Q: What is the minimum iOS/iPadOS version required?**
A: iOS/iPadOS 17 or later is required. This is the minimum version supported by Microsoft Intune for device enrollment and management. Devices on earlier versions cannot be enrolled in Intune and will not receive the Senturo app or App Configuration Policy.
- [Getting Started](https://support.senturo.com/knowledge-base/getting-started?hsLang=en#main-content)
- [Introduction](https://support.senturo.com/knowledge-base/getting-started?hsLang=en#introduction)
- [Access & Team Setup](https://support.senturo.com/knowledge-base/getting-started?hsLang=en#access-team-setup)
- [Connecting Integrations](https://support.senturo.com/knowledge-base/getting-started?hsLang=en#connecting-integrations)
- [iOS](https://support.senturo.com/knowledge-base/getting-started?hsLang=en#ios)
- [macOS](https://support.senturo.com/knowledge-base/getting-started?hsLang=en#macos)
- [Windows](https://support.senturo.com/knowledge-base/getting-started?hsLang=en#windows)
- [Device Enrollment](https://support.senturo.com/knowledge-base/device-enrollment?hsLang=en#main-content)
- [iOS](https://support.senturo.com/knowledge-base/device-enrollment?hsLang=en#ios)
- [macOS](https://support.senturo.com/knowledge-base/device-enrollment?hsLang=en#macos)
- [Android](https://support.senturo.com/knowledge-base/device-enrollment?hsLang=en#android)
- [Windows](https://support.senturo.com/knowledge-base/device-enrollment?hsLang=en#windows)
- [Chrome OS](https://support.senturo.com/knowledge-base/device-enrollment?hsLang=en#chrome-os)
- [Cisco Meraki](https://support.senturo.com/knowledge-base/device-enrollment?hsLang=en#cisco-meraki)
- [Device Management](https://support.senturo.com/knowledge-base/device-management?hsLang=en#main-content)
- [Organization & Grouping](https://support.senturo.com/knowledge-base/device-management?hsLang=en#organization-grouping)
- [Device Status & Actions](https://support.senturo.com/knowledge-base/device-management?hsLang=en#device-status-actions)
- [Integrations](https://support.senturo.com/knowledge-base/integrations?hsLang=en#main-content)
- [Jamf](https://support.senturo.com/knowledge-base/integrations?hsLang=en#jamf)
- [Google Admin Console](https://support.senturo.com/knowledge-base/integrations?hsLang=en#google-admin-console)
- [Microsoft Intune](https://support.senturo.com/knowledge-base/integrations?hsLang=en#microsoft-intune)
- [Incident IQ](https://support.senturo.com/knowledge-base/integrations?hsLang=en#incident-iq)
- [Cisco Meraki](https://support.senturo.com/knowledge-base/integrations?hsLang=en#cisco-meraki)
- [Advanced Features](https://support.senturo.com/knowledge-base/advanced-features?hsLang=en#main-content)
- [Automations](https://support.senturo.com/knowledge-base/advanced-features?hsLang=en#automations)
- [Privacy & Access](https://support.senturo.com/knowledge-base/advanced-features?hsLang=en#privacy-access)
- [Chrome OS](https://support.senturo.com/knowledge-base/advanced-features?hsLang=en#chrome-os)
- [Reporting API](https://support.senturo.com/knowledge-base/advanced-features?hsLang=en#reporting-api)
- [Uninstall Senturo](https://support.senturo.com/knowledge-base/uninstall-senturo?hsLang=en#main-content)
- [macOS](https://support.senturo.com/knowledge-base/uninstall-senturo?hsLang=en#macos)
- [Windows](https://support.senturo.com/knowledge-base/uninstall-senturo?hsLang=en#windows)
- [Troubleshooting & FAQs](https://support.senturo.com/knowledge-base/troubleshooting-faqs?hsLang=en#main-content)
- [iOS](https://support.senturo.com/knowledge-base/troubleshooting-faqs?hsLang=en#ios)
- [macOS](https://support.senturo.com/knowledge-base/troubleshooting-faqs?hsLang=en#macos)
- [Windows](https://support.senturo.com/knowledge-base/troubleshooting-faqs?hsLang=en#windows)
- [Chrome OS](https://support.senturo.com/knowledge-base/troubleshooting-faqs?hsLang=en#chrome-os)
- [Web Application](https://support.senturo.com/knowledge-base/troubleshooting-faqs?hsLang=en#web-application)
- [General Troubleshooting](https://support.senturo.com/knowledge-base/troubleshooting-faqs?hsLang=en#general-troubleshooting)
- [Account & Settings](https://support.senturo.com/knowledge-base/account-settings?hsLang=en#main-content)
- [Data Import](https://support.senturo.com/knowledge-base/account-settings?hsLang=en#data-import)
- [Users & Access](https://support.senturo.com/knowledge-base/account-settings?hsLang=en#users-access)
- [Account Management](https://support.senturo.com/knowledge-base/account-settings?hsLang=en#account-management)
- [FAQs](https://support.senturo.com/knowledge-base/faqs?hsLang=en)
- [Get in Touch](https://support.senturo.com/knowledge-base/get-in-touch?hsLang=en)
# Senturo
Senturo Knowledge Base
Copyright © 2026, Senturo